The Journey to the Wilderness Trail Distillery
By Max Savaiko
This immersive blog will be about the painting and experience of a commission for Wilderness Trail Distillery.
A year or so ago I posted a painting on Facebook. Some reached out and want me to paint their favorite bottle, so I said sure I why not? Did hear back for a few weeks when I thought I got ghosted... again.
Then one day I got another text and phone call, it was Pat Heist (Co Owner of Wilderness Trail Distillery). After some discussion I wound up painting 3 paintings for him, and the distillery. Here are the process photo's and videos of that experience.
Embarking on a journey filled with whisky and art, I recently found myself at the renowned Wilderness Trail Distillery in the heart of Kentucky. This expedition was no ordinary visit; it was an opportunity to present a commissioned painting to none other than Dr. Pat Heist, the visionary behind the exceptional Wilderness Trail Bourbon.
The Distillery's Charismatic Atmosphere: Nestled amidst the picturesque landscapes of Kentucky, the distillery welcomed me with open arms. The rustic charm of the surroundings echoed the authenticity of Wilderness Trail's bourbon-making process. From the sprawling barley fields to the meticulously crafted oak barrels, every detail seemed to breathe life into the narrative of this storied bourbon.
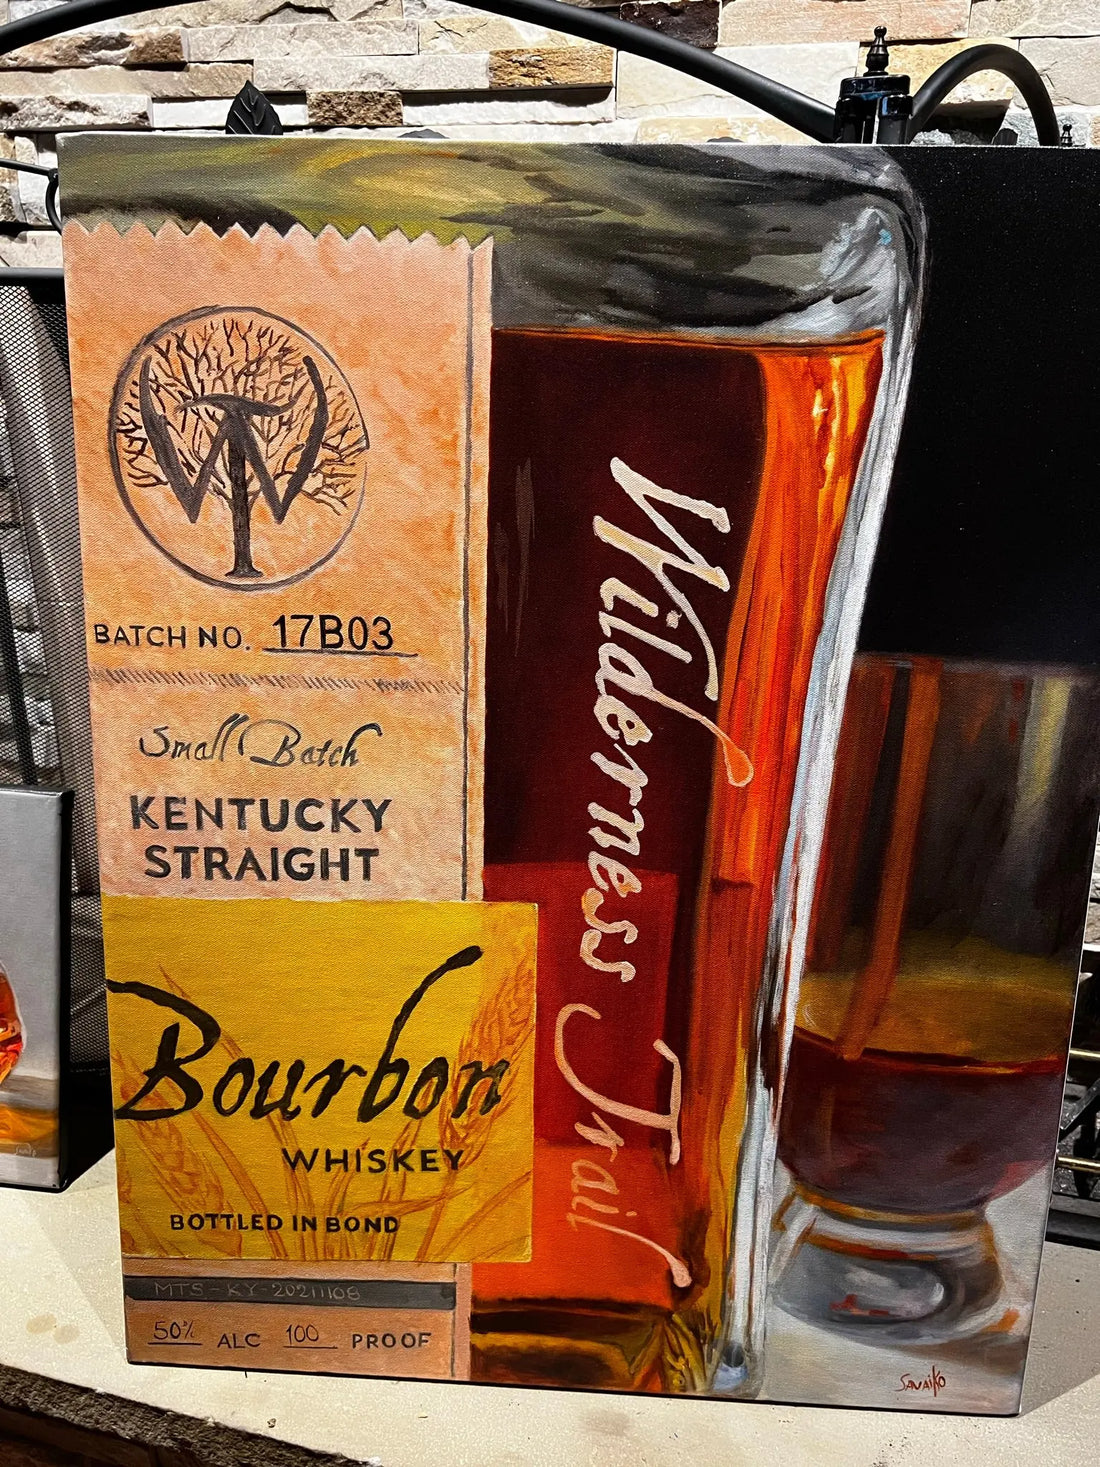
Start out with the concept - a close up version of the bottle, love the colors and details of the label


Block-in and background colors for glazing
The process of "More Glazing" is a technique in painting where layers of translucent colors are applied over an existing dry layer to create depth, luminosity, and a glowing effect in the final artwork. This method involves building up multiple layers of thin glazes, allowing light to pass through the transparent pigments and interact with the layers beneath. The result is a rich and vibrant visual experience that enhances the overall luminosity and intensity of the colors.
Here's a step-by-step description of the glazing process:
Preparation of the Canvas: Begin with a pre-primed canvas or surface. The canvas should be dry and ready to receive layers of glaze.
Base Layer: Apply an initial layer of paint as the base. This layer serves as the foundation for the subsequent glazes. Allow it to dry completely before proceeding to the glazing stage.
Selection of Translucent Colors: Choose a palette of translucent or semi-transparent colors. These colors will allow light to pass through, creating a glowing effect when layered.
Thinning the Paint: Thin down the selected colors with a glazing medium or a clear acrylic medium. This ensures that the glazes are transparent and don't obscure the layers beneath. The ratio of paint to medium depends on the desired transparency and the specific characteristics of the paint being used.


More Glazing of colors that will glow through the art
Application of Glazes: Using a soft brush, apply a thin layer of the thinned-down color over the dry base layer. The key is to apply the glaze evenly and avoid creating thick, opaque layers. Allow each layer to dry before applying the next one.
-
Underpainting: Before applying glazes, artists often start with an underpainting. This initial layer provides a foundation and helps set the tone for the artwork. The underpainting can be monochromatic or consist of basic color blocks, serving as a roadmap for the subsequent glazes.
-
Choosing Colors: The selection of colors for glazing is crucial. Artists often opt for transparent or semi-transparent pigments to allow light penetration. Earth tones, such as burnt sienna or raw umber, are commonly used for underpainting, while vibrant and transparent colors are chosen for glazing to achieve a luminous effect.
-
Glazing Medium: Artists mix their chosen colors with a glazing medium. This medium serves multiple purposes—it thins down the paint for transparency, increases drying time, and enhances the flow of the paint. The choice of glazing medium can influence the final appearance of the glazes.
-
Layering Technique: Glazing is a layering technique where each successive layer is applied once the previous layer has dried completely. This layering process builds up depth and intensity. Artists carefully consider the order of colors and the impact each layer will have on the overall composition.
-
Brush Selection: Soft brushes with fine bristles are often preferred for glazing. These brushes allow for smooth application without leaving visible brushstrokes. A light touch is crucial to avoid disturbing the layers underneath.
-
Controlled Application: Artists control the application of glazes by varying the pressure and direction of their brushstrokes. This control is essential for achieving a seamless transition between layers and maintaining the transparency of the glazes.
-
Drying Time: Patience is key in the glazing process. Each layer needs sufficient time to dry before applying the next. Rapid drying can result in a less effective glaze, while extended drying times allow for a more deliberate layering process.
-
Adjusting Color Intensity: The artist has the flexibility to adjust the intensity of colors by varying the number of glaze layers. More layers intensify the color, while fewer layers create subtler effects. This flexibility enables artists to achieve the desired mood and atmosphere in the painting.

Building Layers: Repeat the process by adding successive layers of glaze. With each layer, the colors begin to build up, creating a sense of depth and complexity. The previous layers will subtly show through, adding to the luminosity of the artwork.

Creating Highlights and Shadows: Adjust the intensity of the glazes to create highlights and shadows. The layering of translucent colors allows for a nuanced interplay of light and shadow, contributing to the overall glowing effect.
Fine-Tuning and Detailing: As the layers accumulate, artists can fine-tune details, enhance contrasts, and refine the composition. The glazing process allows for a delicate approach to detailing while maintaining the luminous quality of the colors.

Varnishing Day
Final Varnishing: Once the painting is complete and all layers are thoroughly dry, a final varnish can be applied to protect the artwork and further enhance its luminosity.
The "More Glazing" technique requires patience and a keen understanding of color theory. Artists using this method often find it an effective way to create visually stunning and ethereal effects in their paintings, allowing colors to not only exist on the surface but to radiate and glow from within the artwork. I love this process eventhough it is time consuming, the end product is worth it. See below
Final Product - Ready for the trail

The Grand Unveiling: As the moment of revelation approached, the tasting room at Wilderness Trail Distillery buzzed with excitement. Dr. Pat Heist, a maestro in the world of bourbon, awaited the unveiling with a blend of curiosity and eagerness. Max Savaiko, carrying his creation with a mixture of pride and humility, stepped forward to reveal the art that had become a labor of love.
The painting, bathed in warm light, unveiled itself to an audience that held its collective breath. A hush fell over the room as the vibrant colors and intricate details of the artwork became apparent. The canvas spoke, telling the story of Wilderness Trail through Max Savaiko's artistic lens.
Dr. Pat Heist's Reaction: Dr. Pat Heist, a man intimately connected to the distillery, stood transfixed. His eyes traced the contours of the painting, absorbing every nuance and detail. The room echoed with the quiet but profound appreciation that only an artist and a connoisseur of bourbon could share. It was a moment frozen in time, where the creation met its muse, and Wilderness Trail's essence manifested in brushstrokes.
A Shared Connection: The painting not only captured the essence of Wilderness Trail but also mirrored the shared ethos of Max Savaiko and Dr. Pat Heist. It was a testament to the dedication, passion, and innovation that defined both the artist and the distiller. The canvas became a bridge, connecting the realms of art and bourbon, forging a bond that transcended the physical space of the distillery.
Exploring the Details: As the initial awe settled, Dr. Pat Heist engaged with Max Savaiko, exploring the details embedded in the painting. Each stroke seemed to narrate a different chapter of Wilderness Trail's story – from the carefully selected grains to the artistry involved in crafting the barrels. The painting was not just an artwork; it was an invitation to delve deeper into the nuances of the bourbon-making process.
A Toast to Art and Bourbon: Following the unveiling, the celebration continued with a tasting of Wilderness Trail's finest bourbons. Glasses were raised in a toast to the artistic collaboration that had unfolded before our eyes. Max Savaiko and Dr. Pat Heist shared stories, insights, and laughter, creating a bond forged in the fires of creativity and passion.
Conclusion: The Max Savaiko reveal of Wilderness Trail Art to Dr. Pat Heist was an unforgettable chapter in the distillery's history. It was a moment where two worlds converged – the world of art and the world of bourbon. Max Savaiko's painting now adorns the distillery, a living testament to the shared dedication and craftsmanship that define Wilderness Trail. As the sun dipped below the Kentucky horizon, the echoes of this artistic revelation lingered, creating a legacy that transcends both canvas and cask.
Lastly we did a run of prints for the gift shop - they can be found here
Wilderness Trail Bourbon Small Batch Print